Tweet
There are LOTS and LOTS of pages out there that describe how to increase the number of subscribers to your YouTube channel.
I'll describe what I've done to add about 150 subscribers in about 2 months.
First off, I do not recommend using these Sub4Sub (subscriber for subscriber) groups. There are quite a few on Facebook. But YouTube has mechanisms in place to detect people who are simply swapping a subscription for another. I've had a couple of warning messages from YouTube about this and they've actually removed some of my subscribers!
I've discovered a website that allows you to search through YouTube channels for specific characteristics. For instance you can search for channels about fishing, that have posts in the past 5 days and have no more than 100 subscribers.
What I've found is that if you find small (less than 100 subs) and ACTIVE channels, who are posting about topics that interest you, these people are MUCH more likely to subscribe back to you, especially if you leave a nice comment on their videos :-)
The web site is called YouTube Crawler and you can find it here:
https://www.channelcrawler.com/
This is not a silver bullet. It does require quite a bit of work on your part, but you are much more likely to get subscribers who will actually watch your channel!
And it has the added benefit that you will find some interesting, undiscovered YouTube channels out there!
Enjoy and please check out my YouTube channel below!

I believe we learn new things all the time. Anything from "Crazy Glue is REALLY sticky!" to "This is how to configure a web server". This blog is where I compile the things I learn, just "In Case You Need To Know ..."
Friday, January 11, 2019
Monday, January 15, 2018
Why are we stuck in the financial past in Canada?
Tweet
In this day of credit cards, tap-to-pay and online payments, why are we so stuck in the past for some financial transactions?
I recently sold my car in Quebec. This is the process that we went through to transact the sale:
Why does the sale of a car depend on the physical movement of a piece of paper?? (ie: the bank draft)
Why couldn't all of this exchange be done online? In a few minutes?
I also experienced similar frustration while leasing a new apartment.
Why does this entire process rely on sending a physical piece of paper?? (ie: the cheque)
In this day of credit cards, tap-to-pay and online payments, why are we so stuck in the past for some financial transactions?
I recently sold my car in Quebec. This is the process that we went through to transact the sale:
- settle on a price (via email, at least)
- the buyer went to his bank to get a bank draft
- we went to the SAAQ together and stood in line for 15 minutes
- the woman accepted my registration card, tore it up and issued a new one to the buyer
- she also issued him a new license plate (why??)
- the buyer handed me the bank draft
- I handed him the keys
- I went to my bank to deposit the bank draft in my account
Why does the sale of a car depend on the physical movement of a piece of paper?? (ie: the bank draft)
Why couldn't all of this exchange be done online? In a few minutes?
I also experienced similar frustration while leasing a new apartment.
- traveled to the city where we were going to move
- spent the day looking at apartments
- unexpectedly found something we liked the first day
- filled in all the paperwork to make an offer (there's a lot of paperwork!!)
- realized that we needed a cheque to make an offer but didn't have our cheque book
- drove home
- went to UPS to overnight a cheque back
- discovered that UPS doesn't do overnight delivery on the weekend (it was Sunday)
- sent the cheque anyways so it would arrive Tuesday
- the city was hit by a snow storm, so the cheque only arrived Wednesday
Why does this entire process rely on sending a physical piece of paper?? (ie: the cheque)
Friday, January 5, 2018
Things you can do to reduce your risk from Spectre and Meltdown
Tweet
If you use Chrome as a web browser, do the following:
- go to chrome://flags/#enable-site-per-process
- enable "strict site isolation"
- restart your browser when prompted
If you use Windows, make sure you have the security patch installed.
Specifically, the patch is Security Update for Windows (KB4056892)
If you use a Mac or an iPhone, make sure you're at version 11.2 of IOS or later.
For Android phones, if you don't have a Google phone, you'll have to wait for your service provider to push out a patch.
Monday, July 31, 2017
Astrophotography failure with Canon PowerShot SX50 HS
Tweet
That was the short version. If you're interested in reading the details, please continue.
I've tried on numerous times before, all unsuccessful. I've tried different ISO settings, different exposures, different zoom, focal length, etc... But the only celestial bodies I've been able to successfully photograph are the sun and the moon.
The basic problem seems to be that the camera's Manual mode is not really manual. It prevents you from using certain combinations of settings. In particular, it won't let you set a high ISO value if you have an exposure longer than 1".
I read several blog posts about this from other people. One person even contacted Canon customer support. They agreed that it was a limitation in the firmware and they have no plans to change it.
So, in conclusion, if you plan to take photographs of the stars, do NOT buy a Canon PowerShot SX50 HS.
Disappointing....
| So, I decided to take a stab at photographing the stars with my Canon PowerShot SX50 HS camera. Short version: DON'T! It will NOT take photos of the stars. |  |
That was the short version. If you're interested in reading the details, please continue.
I've tried on numerous times before, all unsuccessful. I've tried different ISO settings, different exposures, different zoom, focal length, etc... But the only celestial bodies I've been able to successfully photograph are the sun and the moon.
So after some research, I discovered something called "stacking" which involves taking multiple shots of the same scene and then using software to merge all of these together to make a much more detailed picture.
The software I found, that seems to be the favorite in the community, is called DeepSkyStacker. You can find it here: http://deepskystacker.free.fr/english/index.html
To begin with, I'll point out a couple of obvious facts that I missed.
1) On my first attempt, I captured all of my pictures in JPG format. You should be shooting all these pictures in RAW mode. DeepSkyStacker scolded me for not using RAW.
2) On my second attempt, my exposure time was only 1 second per shot, so there was not enough light captured on each image. DeepSkyStacker informed me that it was only going to stack a single frame from the 15 or 20 I had shot. Bummer!
Before going out for your first photo shoot, you can begin by taking some reference shots. These are what DeepSkyStacker will ask you to provide
1) Bias or Offset frames: These are basically pictures you take with the lens cap on your camera. They remove any bias or offset from reading the camera's sensor. You usually only need to take these once. You should have your camera set to the ISO speed you will use for your real photographs and the exposure to the shortest possible your camera will allow. Take at least 15 of these shots, but more is better.
2) Flat frames: These provide a reference to remove vignetting and other optical artifacts of your camera. You usually only need to take these once. Your camera should be setup the way it will be used to take your real photographs (ie: same ISO, etc...) Then, cover the lens with a paper towel and point your camera at a bright light source, like the daytime sky. Take at least 15 of these shots, but more is better.
Then, when you go out for your night time photo shoot, you'll capture the following:
3) Dark frames: These provide a reference to remove the dark signal from the light frames (ie: your photos). It's best to take these when you're done shooting your photos since temperature is important. With the camera still set up the same way (ISO, exposure, etc...) just put the lens cap on and shoot at least 15 frames. As always, more is better.
Last night was reasonably clear, so I tried for the third time. Same non-results.4) Light frames: These are the actual photographs of the stars. Again, take as many shots of the same scene as you can.
The basic problem seems to be that the camera's Manual mode is not really manual. It prevents you from using certain combinations of settings. In particular, it won't let you set a high ISO value if you have an exposure longer than 1".
I read several blog posts about this from other people. One person even contacted Canon customer support. They agreed that it was a limitation in the firmware and they have no plans to change it.
So, in conclusion, if you plan to take photographs of the stars, do NOT buy a Canon PowerShot SX50 HS.
Disappointing....
Sunday, July 30, 2017
Do-it-yourself trolley/dolly/cart/trailer for a kayak or canoe for $40
Tweet
I live fairly close to a river and I recently bought myself a Pelican Kayak from Canadian Tire

However, the kayak weighs 30 lbs. Granted, that's not terribly heavy, but carrying it on your shoulders for 10-15 minutes down the street and through traffic is a bit cumbersome.
I could ask my wife to carry one end, but she's not always available.
So I shopped around for a trolley to pull it on. The cheapest one I found was $80 before tax and the most expensive one was $150 (also before tax). Both were from Canadian Tire (ok, I didn't shop around that much)
Anyways, I was unwilling to spend that kind of money for what was basically a metal frame with wheels. So I went the "do it yourself" route.
While I was at Canadian Tire, griping about the cost of the trolleys, I looked around. I ended up buying the following:
It all came to a total of about $40 CDN
I took it all home and assembled it like this:

The metal hardware I already had. They are 1/4 inch bolts with eyes on the end, left over from some other project I was working on. They fit perfectly through the wheels.
I drilled a 1/4 inch hole in each end cap and squeezed the nut inside the T joint. Everything tightened up nicely.
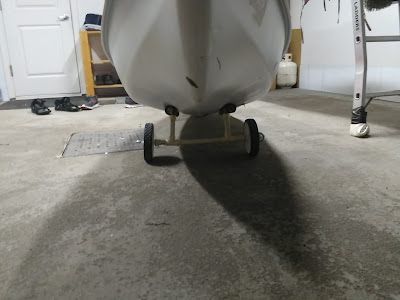
You'll notice the cross piece is bowing slightly due to the weight of the kayak.
And my first failed attempt at transporting my kayak caused everything to fall apart.
I found I had to re-enforce the joints. I drilled holes through the joints and inserted nails to prevent the joints from coming apart. My trip to the water involves walking down a side walk and each joint rattle the boat and the trolley pretty badly.
I also included a ratcheting strap to hold the kayak in place as well as to provide structural re-enforcement to the cross piece.

Notice that the cross piece is much straighter. And riding over the joints in the sidewalk is much easier and involves less rattling.
As a bonus, the trolley is small and light-weight enough that I can strap it to the back of my kayak when I go out, so I don't have to leave it unattended on the shore.
Check out a video of me using it here: https://youtu.be/9gqfc3OP3wc
Enjoy!
I live fairly close to a river and I recently bought myself a Pelican Kayak from Canadian Tire

However, the kayak weighs 30 lbs. Granted, that's not terribly heavy, but carrying it on your shoulders for 10-15 minutes down the street and through traffic is a bit cumbersome.
I could ask my wife to carry one end, but she's not always available.
So I shopped around for a trolley to pull it on. The cheapest one I found was $80 before tax and the most expensive one was $150 (also before tax). Both were from Canadian Tire (ok, I didn't shop around that much)
Anyways, I was unwilling to spend that kind of money for what was basically a metal frame with wheels. So I went the "do it yourself" route.
While I was at Canadian Tire, griping about the cost of the trolleys, I looked around. I ended up buying the following:
| 4 feet of rigid 1/2 inch PVC tubing |
 |
about $7 for 4 feet |
| 4 white 1/2 inch PVC T-joints |
 |
about $2 each |
| 2 white 1/2 inch PVC end caps |
 |
about $1 each |
| 2 wheels |  |
about $9 each |
| 4 feet of 1/2 pipe insulation |  |
less than $1 |
It all came to a total of about $40 CDN
I took it all home and assembled it like this:

The metal hardware I already had. They are 1/4 inch bolts with eyes on the end, left over from some other project I was working on. They fit perfectly through the wheels.
I drilled a 1/4 inch hole in each end cap and squeezed the nut inside the T joint. Everything tightened up nicely.

You'll notice the cross piece is bowing slightly due to the weight of the kayak.
And my first failed attempt at transporting my kayak caused everything to fall apart.
I found I had to re-enforce the joints. I drilled holes through the joints and inserted nails to prevent the joints from coming apart. My trip to the water involves walking down a side walk and each joint rattle the boat and the trolley pretty badly.
I also included a ratcheting strap to hold the kayak in place as well as to provide structural re-enforcement to the cross piece.

Notice that the cross piece is much straighter. And riding over the joints in the sidewalk is much easier and involves less rattling.
As a bonus, the trolley is small and light-weight enough that I can strap it to the back of my kayak when I go out, so I don't have to leave it unattended on the shore.
Check out a video of me using it here: https://youtu.be/9gqfc3OP3wc
Enjoy!
Handbrake fix for broken up and garbled video
Tweet
I wanted to backup some of my movies that I have on DVD, so I installed Handbrake, available from http://handbrake.fr/downloads.php
Most of my DVDs copied with no problem, but not all of them.
A few created videos that were pixelated and unwatchable, like this:

After some searching on Google, I discovered that the fix was simple.
There is a missing library for Handbrake called 'libdvdcss-2.dll'
It's available for download from here:
http://download.videolan.org/pub/libdvdcss/1.2.11/win64/libdvdcss-2.dll
Simply copy it into your Handbrake folder (usually C:\Program Files\HandBrake) and re-start Handbrake.
Problem solved... almost
I now had an issue with incomplete copying of DVDs. Handbrake would stop after about half of the DVD had been copied without any indication of failure. The only thing I did to resolve this was to install the latest version of VLC (available here: https://www.videolan.org/vlc/download-windows.html)
Now it all worked correctly! Finally!
NOTE: You should only copy DVDs that are your own and only for the purpose of creating backup copies. I do not endorse ripping DVDs for any other reason.
Tuesday, June 27, 2017
Analysis of my YouTube channel with respect to number of views and revenue
Tweet
I've had my YouTube channel for 10 years now, since 2007. You can see it here (please subscribe if you're interested): http://www.youtube.com/KedarWarriner
I created it initially just to share videos with friends and family. After a while, I realized I could earn money by monetizing my videos. But I never really took it seriously. After about 5 years, I reached the $10 threshold where Google will send you a payment. But I never turned it on, just because I'm not American and I didn't want to have to deal with earning a few bucks in the US.
But then, in 2016, I started to take it a little more seriously. And in 2017, I bought a GoPro Hero4 Session camera and started going crazy with making videos.
Within 3 months, my balance went from $18 to $52. And this was without any kind of advertising. I would just post my videos on Twitter, Facebook and Google Plus.
Even still, with all these example of videos that I've posted, I have trouble understanding why some are much more popular than others.
Some of the videos I've posted I think are REALLY cool. For example, I attached my GoPro to a selfie-stick and then stuck it under water in the St-Lawrence, near Kingston. And created a really beautiful video (in my opinion). Yet, in a 2 month period, it's only had 26 views. You can see it here and judge for yourself:

On the other end, I used my GoPro to film my drive home from work, during a snow storm. Nothing particularly interesting happens during the drive. No accidents or anything. Yet, the video was viewed over 1000 times within a few days! Check it out below:

So far, I haven't been able to figure out a relationship between how interesting the video is and how many times it's viewed.
I've played with the tags and the titles. I've tried changing the thumbnail picture of one video to be a woman in a bikini. I figured "sex sells". Yet during the time that the thumbnail was changed, not a single person viewed the video.
Another weird example: I placed my GoPro inside a birdfeeder outside my house. I managed to capture a couple of cardinals feeding. In one video, it's shown in real time. In the other video, the arrival and departure of the birds is done in slow motion so you can see them flapping their wings. In my opinion, it's super cool to see them flying in slo-mo. Yet, the real time video was viewed 25 times while the slo-mo video was only viewed 10 times.

I created it initially just to share videos with friends and family. After a while, I realized I could earn money by monetizing my videos. But I never really took it seriously. After about 5 years, I reached the $10 threshold where Google will send you a payment. But I never turned it on, just because I'm not American and I didn't want to have to deal with earning a few bucks in the US.
But then, in 2016, I started to take it a little more seriously. And in 2017, I bought a GoPro Hero4 Session camera and started going crazy with making videos.
Within 3 months, my balance went from $18 to $52. And this was without any kind of advertising. I would just post my videos on Twitter, Facebook and Google Plus.
Even still, with all these example of videos that I've posted, I have trouble understanding why some are much more popular than others.
Some of the videos I've posted I think are REALLY cool. For example, I attached my GoPro to a selfie-stick and then stuck it under water in the St-Lawrence, near Kingston. And created a really beautiful video (in my opinion). Yet, in a 2 month period, it's only had 26 views. You can see it here and judge for yourself:
On the other end, I used my GoPro to film my drive home from work, during a snow storm. Nothing particularly interesting happens during the drive. No accidents or anything. Yet, the video was viewed over 1000 times within a few days! Check it out below:
So far, I haven't been able to figure out a relationship between how interesting the video is and how many times it's viewed.
I've played with the tags and the titles. I've tried changing the thumbnail picture of one video to be a woman in a bikini. I figured "sex sells". Yet during the time that the thumbnail was changed, not a single person viewed the video.
Another weird example: I placed my GoPro inside a birdfeeder outside my house. I managed to capture a couple of cardinals feeding. In one video, it's shown in real time. In the other video, the arrival and departure of the birds is done in slow motion so you can see them flapping their wings. In my opinion, it's super cool to see them flying in slo-mo. Yet, the real time video was viewed 25 times while the slo-mo video was only viewed 10 times.
Subscribe to:
Posts (Atom)